Calling All Pyros: How To Set The World On Fire (Using Photoshop, Of Course)
A recent assignment called for an illustration about the lack of governance in today’s world: politicians going round endlessly in circles, never taking any decisive action to solve problems. My idea: pols pacing around the Earth on a Saturn-like ring, while the planet goes up in flames. Here’s the final: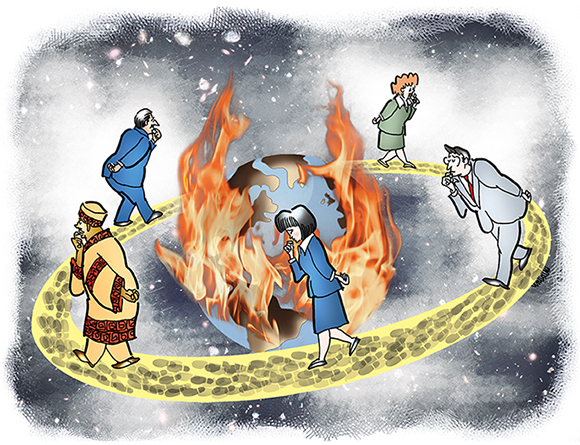
Here’s a close-up showing more detail: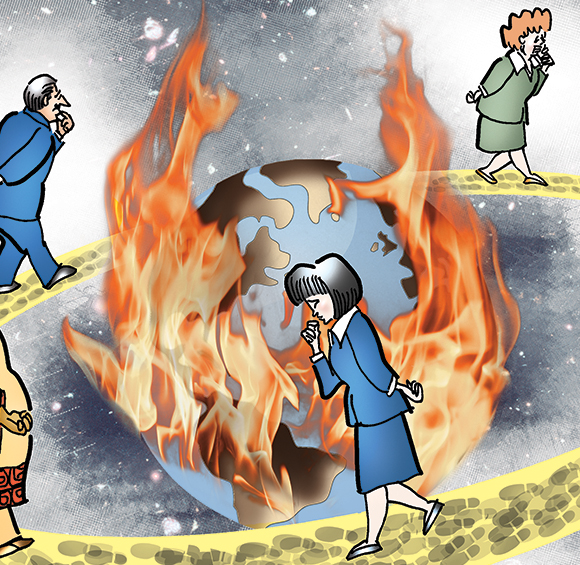
The illustration combines both hand-drawn and photo elements. I thought it might be helpful to show how I imported the flames into the illo. Here’s the relevant portion before things got hot: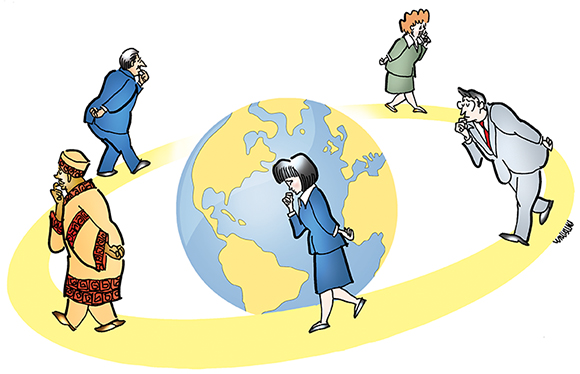
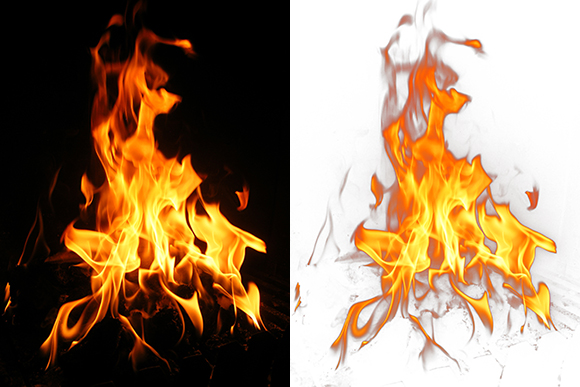
I found a photo of a campfire at night (left, below). I opened the image in Photoshop, accessed the Channels palette, and Command-clicked (I’m on a Mac) on the Red channel. Doing so selects pixels based on their “brightness” values. Black pixels will be ignored. In effect, we are selecting the lightest part of the image contained in the Red channel.
You will see the familiar Photoshop “marching ants” around the selection, but only pixels which are 100% selected will appear in that area. Pixels which are only partially selected remain invisible, outside the area defined by the “marching ants.”
Confusing, right?
Looked at another way: if you copy the selection and paste it onto a white background, this is what you’ll see (on right, below). The darkish film on the outer edges of the flames represents the pixels which were only partially selected– they are now visible against the white background.
What’s important to remember here: if you use this selection method to extract flames, these muddy, partially selected pixels will be included when you paste your selection into another image– and you’ll need to mask them out.
(For a better understanding of this method– and some additional tricks as well– take a look at Steve Patterson’s tutorial on Creating Luminosity-Based Selections.)
Here’s the extracted flames pasted into my illustration, and scaled down to fit. The muddy, partially selected pixels are clearly visible.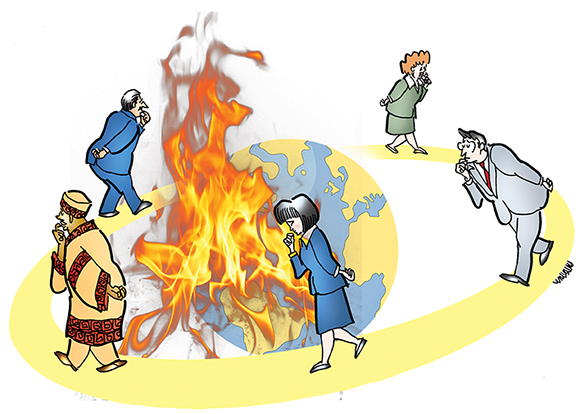
I used both the Warp tool and the Liquify filter to align the flames along the curve of
the earth. Then I added a Layer Mask to the new Flames layer, and used a soft brush set at low-opacity to paint with Black and carefully mask out the unwanted muddy pixels. 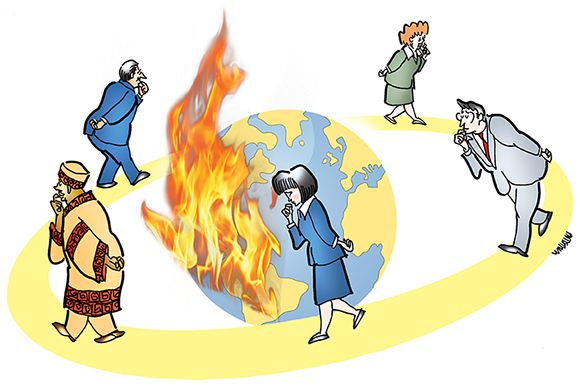
I found a second campfire image, and repeated the above steps, adding flames to the right-hand side of the earth, then warping them into position, and masking out unwanted pixels.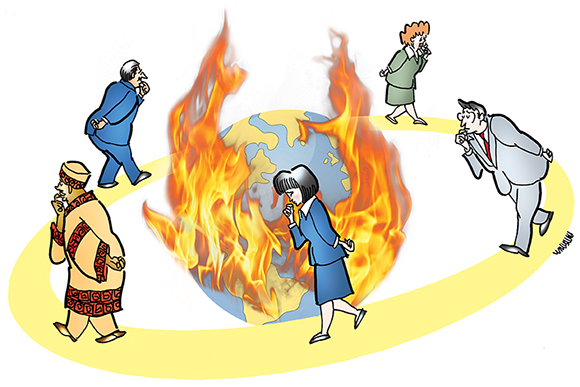
I thought it would look more realistic to have the fire blackening the earth’s land masses. How was this done? Scroll down.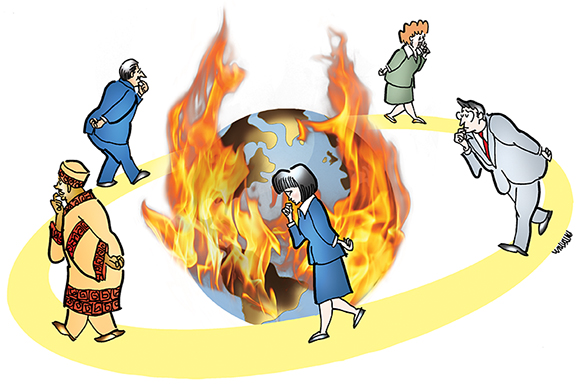
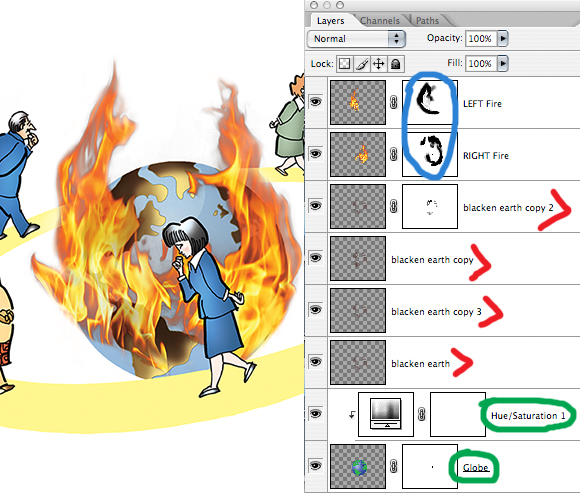
As you can see in the Layers window on the right, I created a new layer called “blacken earth.” I selected the land masses, then painted over them on the new layer with a soft brush set at low opacity and Mode = Color Burn (that particular mode is one which will darken pixels on the underlying layer).
I then duplicated the “blacken earth” layer several times, experimenting with different layer modes (Multiply, Overlay, Soft Light) and opacity settings until I had a blackened effect that looked right.
Also visible at the top of the Layers window and circled in blue: the masks on the two Flames layers that allowed me to paint over (mask out) the muddy, partially selected flame pixels.
And FWIW: if you look at the Globe layer thumbnail at the bottom of the Layers window, you might be able to see (dimly) that the original globe had green land masses and bright blue water. I used a Hue/Saturation adjustment layer to change those colors to tan land masses and muted blue water to better fit the illo’s overall color scheme.
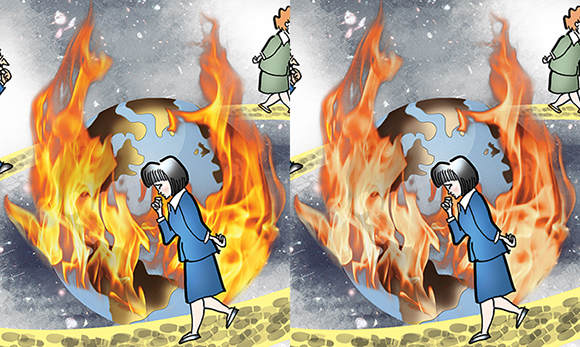
Finally, if you compare the preceding images to the final, you’ll notice that I adjusted the colors of the flames, making them considerably more muted. I think most people would prefer the brighter flames– and so do I. So why did I change them?
Because the illustration will appear in print, it uses the traditional 4-color CMYK color space, rather than the brighter (much wider color spectrum) RGB color space which is used for web images. I imported the flames from an RGB web-based image.
Looking at them here on the web, the flames appear to display a “true yellow.” However, most RGB yellows contain traces of blue (cyan). The blue is not visible when seen in an RGB environment (the web), but in print, that trace of blue will give the yellow a greenish cast.
To prevent that, I used a Hue/Saturation adjustment layer to reduce the saturation of the flames, eliminating the trace of cyan that gives the flames that extra vibrancy. The result is not as attractive, but it heads off any “green cast” problem when the illo appears in print.
What about the yellow “Saturn ring” that the people are walking on? That’s yellow– don’t I have to worry about that as well? No, because I created the ring myself, and I was careful to choose a yellow with no trace of blue (cyan = 0%).
![]() What do you think? Is it an effective illustration? Know a better way to extract fire in Photoshop? Hope you’ll leave a comment.
What do you think? Is it an effective illustration? Know a better way to extract fire in Photoshop? Hope you’ll leave a comment.
If you enjoyed this post, I invite you to subscribe. You can either leave a comment and click the box that says Notify me of new posts via email, or click on the Subscribe button below the Portfolio Thumbnails in the sidebar at the top right of this page.![]()
Shhh! The Secret Advantage Of A Micro Portfolio


It is a shame when you have to change the colour of an image you really like for print. I’m sure it looked great though and the colours were shown the way you wanted it to be ^_^
The work is still brilliant either way! It illlustrates what the topic is about really well.
But I really like how you have demonstrated the process of the final work. It’s always interesting to see what you do and how you do it. Reading it all has made me learn a quite few things. =]
If it’s ok with you, can I borrow the fire (black b/g) image and experiment with Masking? I tend to avoid the technique but it’s something I should really get to grips with.
LikeLike
So many nice compliments!– I had to apply an ice bag to my head to keep it from swelling up… : P
Yes, feel free to experiment with the fire image. Any image will do for masking practice, really. You might try making a rough selection of an object with the Lasso tool, pasting it into another image, adding a layer mask, then painting on the mask with Black to hide the unwanted bits. It definitely pays to learn masking because it’s a non-destructive technique– if you make a mistake, you can always paint on the mask with White to bring back (= make visible again) anything you accidentally masked out.
Always good to find Fox paw prints on my blog!! : )
LikeLike
Thanks Mark ^__^
That is very clever stuff. It seems like it is a much easier technique than having to use the eraser tool to remove unwanted areas. Gonna go try it now!
LikeLike
Yes indeed, once you learn masking, you’ll be an even more powerful illustrator– which is kinda scary, ’cause you’re pretty darn powerful now… : )
LikeLike
It’s genius…not only the way you created it but also the concept itself. WOW!!!!!!
It looks like it’s moving!
Stellar!
(Channels? Must be the grown-up Photoshop, then)
LikeLike
Whoa-de-whoa-whoa!
Such praise knocks me outta my orbit! makes me see stars! sends me over the moon! and– and– like that!! Thanks, Obi-Wan!
The grown-up Photoshop?? It can’t be too mature if I’m using it… : )
LikeLike
LOL!!
::waves at Mark Armstrong over the event horizon::
Ahhh…well…I have Photoshop Elements 8.
No channels.
But they sound wonderful!
LikeLike
No channels– sounds like my television during bad weather… : ( Nothing like an analog converter for encouraging one to look elsewhere for so-called entertainment!! : )
LikeLike
Mark why didn’t you change the flame image to CMYK before you put it into your CMYK image? I know you said you were concerned that the yellow would take on a greenish tint but couldn’t that be remedied by adjusting the color balance and hue/saturation so you could maintain the vibrance? Heck, I’m wowed by the Exposure and Vibrance feature in Photoshop everytime I use it and maybe that might have helped you to not have to settle for the muted version . It is a very nice use of the flames by any means and I look forward to trying your technique to remove the “muddy pixels”. They are so very pesky and pop up way too often.
LikeLike
Hi, Chloe. Your comment made me laugh, and it made me blush.
I never thought to change the Flame image color mode from RGB to CMYK before selecting and copying the flames, and pasting them into my Globe image. That would, of course, have been the sensible thing to do!
As I think you implied, however, that would not have solved my “greenish tint” worry. I know from sad experience that converting an RGB yellow to a CMYK yellow does not mean the resulting CMYK yellow will have C (cyan) = 0%. It will almost always have C = 1-5%, and even 1% is enough for the printed yellow to have a green cast.
I honestly can’t remember whether I restricted the change to “Yellows” when I did my Hue/Saturation adjustment to reduce the saturation of the flames, or if (instead) I used the “Master” setting which means the saturation reduction would have affected all colors.
I think you’re saying that restricting the color adjustment to Yellows Only to minimize the “vibrancy drop” would have been a smart idea. I’d say you’re absolutely right. (You mentioned Color Balance, I think Select Color would have been worth trying, too.)
Really appreciate the excellent feedback, and glad you found the post instructive– a pox on muddy pixels!! : )
LikeLike
I was trying to figure out the people’s expressions goin’ around the circle. They look too serious!
By the way we haven’t forgotten about your contribution. Just timin’ things on the publication.
LikeLike
Say, you’re right– they should be overjoyed to be in one of my illustrations!! Buncha party poopers, I’ll have to have a word with them… : )
Ah yes, my mysterious contribution. Thought I’d hold off doing a post on it till after you publish– give you a clear field and let you shock and amaze an unsuspecting world… : )
Cheers, Jean!
LikeLike
I like your idea of that illustration and love your work. Unfortunately I cannot give you any answer about a better way to extract fire in Photoshop since I have never had experience with Photoshop.
It’s very good work and you are very generous in sharing your knowledge! Thanks for that!
LikeLike
Glad you liked the post and the illo. Don’t worry, you can always “extract fire” with your camera– by taking a picture of it. Snap!! : )
LikeLike