Hey, Bertie Bott– Time To Brighten Up Your Beans!!
 I’m a Harry Potter fan. After seeing these illustration tributes to Harry, I decided to do one of my own. Here’s the final.
Scroll down to see how I used Photoshop Layer Groups to boost the color of the Bertie Bott’s Beans without simultaneously affecting the rest of the illustration.

I got to this point in the illustration and decided my beans looked much too drab:
If the beans had all been on one layer, I could have simply clipped a new adjustment layer to the bean layer, thereby restricting the adjustment to that one layer.
However, my beans were spread out on four different layers. If I applied an (unclipped) color adjustment above the topmost bean layer, the color change would be applied to all layers below, not just the four bean layers. I’d wind up with this garish result:

One solution would be to apply four separate sets of identical adjustment layers to each of the four bean layers. That would restrict the color changes to only the bean layers. A more efficient approach is to group the four bean layers together, then apply any adjustments to the group. That’s what I decided to do here.
The three Layer Windows below show the basic sequence: in the first window, we see the four separate bean layers. In the second, I’ve selected those four layers. I then chose Layers > Group Layers. The third window shows the result: the four bean layers are now grouped together in “Group 1.”
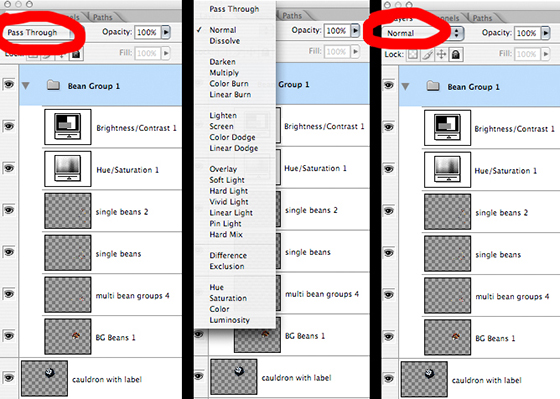
When you group layers together, Photoshop gives the resulting group layer a default blending mode of Pass Through. That means any adjustments applied to the group as
a whole will “pass through” the group and also be applied to all layers below the group– which is exactly what I did not want.

How do we solve this problem? Easy: we simply access the Blending Mode pop-down menu and change the mode from “Pass Through” to “Normal,” as shown below. Now any adjustment applied to the group will be restricted to only the layers in the group.
I applied Hue/Saturation and Brightness/Contrast adjustment layers to the group.
Worth noting: when you apply an adjustment layer to a group, you do not apply it above the Group layer. Rather, you apply it inside the Group folder, above the topmost layer in the group. See below.
Here’s a Before and After comparison of my “bean color adjustment.” As you can see, the color change is restricted to the beans. The rest of the illustration is unaffected.
Conclusion: the magic of Photoshop lets anyone be a wizard. Here’s the final again. Boo, Voldemort! Hurrah for Bertie Bott’s Beans!!


